Downloading & Installing the Software

Time to make this a departure board!

Quick Summary Video

Step 1: Installing Program Dependencies

First, we need to download the packages needed by the departure board.

  • Once again turn on your pi wait 2min and then open putty and SSH into it. Once you have logged into your Pi type in the following commands.
  • Each command must be typed in one at a time and then executed individually; waiting for each to complete before doing the next. You may be prompted to press 'y' to accept at points or to enter in your password. Some stages will take longer than others and some may output error messages, so long as the whole command does not fail this is okay.
  • sudo apt install git -y
  • sudo usermod -a -G spi,gpio display
  • sudo apt install python3-dev python3-pip python3-numpy python3-lxml libfreetype6-dev libjpeg-dev build-essential python3-pil  zlib1g-dev liblcms2-dev libopenjp2-7 libtiff5 -y
  •  sudo apt install libsdl2-dev libsdl2-image-dev libsdl2-mixer-dev libsdl2-ttf-dev -y
  • sudo -H pip3 install -U setuptools luma.oled luma.emulator inflect nre-darwin-py
  • sudo apt update -y && sudo apt dist-upgrade -y
  • cd ~
  • git clone https://github.com/jfoot/Bus-Departure-Board.git
  • cd  Bus-Departure-Board/
  • python3 DemoPy3.py

If everything has worked correctly you should now see the demo program running. This is not actually live data but it allows us to check that your pi is working correctly. In which case you can now press Ctrl-C to exit out of it and continue onto the next stage. If an error is outputted then you might not have installed all the packages above correctly, please type in the commands again. If there is no error message but your screen is blank then you might have an issue with the wiring.

Step 2: Get Your API Keys

To get live data you'll need your own keys, don't worry, they're free!

Depending upon what program you want to run will depend upon what API Keys you are going to need. Currently the following programs are included:
  • Reading Buses - If you would like to create a bus display board specifically for Reading Buses you should go-to the following site and create an API account here: https://reading-opendata.r2p.com/register
  • NationalBuses (Any UK Bus Stop)- If you would like to create a bus display board for any UK bus stop you should go-to the following site and create an API account here:
    https://developer.transportapi.com/signup This API also includes all Reading bus stops but does not contain the same level of detail, also note some stops in the UK are only timetabled data and not real live data; data quality will vary region to region. Transport has changed their pricing policy, the free limit has been reduced heavily.
  • NationalRail (Any UK Train Station)- If you would like to create a train station display board for any UK train station (excluding tube stations) you should go-to the following site and create an API account: https://realtime.nationalrail.co.uk/OpenLDBWSRegistration/
  • Transport for London - If you would like to create a London Underground Tube Station live departure board, you will need to go to the following site and create an API account here: https://api-portal.tfl.gov.uk/signup
Once you have an API account you will have your own API Key (and API App ID If needed) so that you can access the data yourself. Make sure you find these values and record them down, they will be needed next.
You will also need to know your bus stop or train station ID to query for. If you do not know the ID of the stop or station you are interested in please read the following documentation on how to find it: https://www.jonathanfoot.com/Projects/DepartureBoard/FindStopID.html

Step 3: Auto-start Program On Boot

Tell the program to start everytime you power on your Pi.

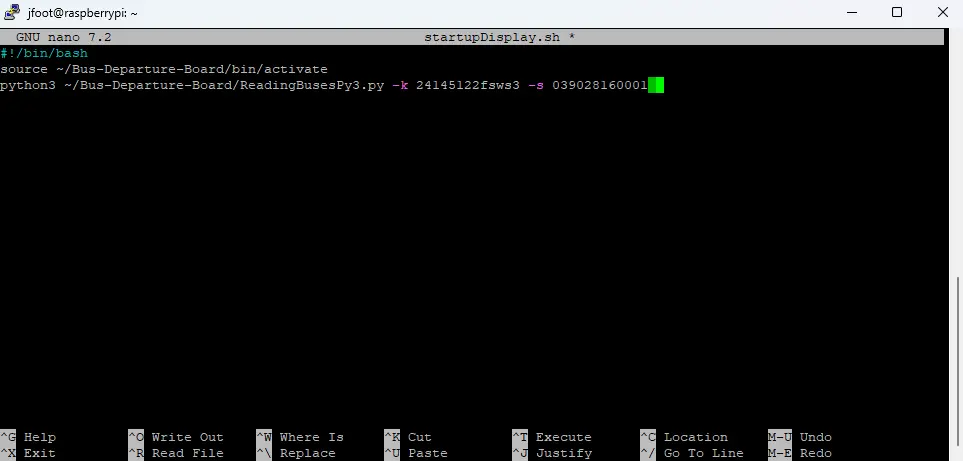
To run the program automatically each time you plug in your pi we need to create a start up service, follow the instructions below once you have your API key and stop/station ID needed.

  • cd ~
  • nano startupDisplay.sh
  • Once nano (text file writing program) has loaded write at the top of the new file:
  • #!/bin/bash
  • Now depending upon which program you want to run on start up will depend on the command you write. Below will give you examples of all four programs included, only write out ONE of these commands and make sure you replace any API credentials with your own API keys (and ID if needed).
  • You can also go to Stage 3 to automatically generate your specific program start up command and then come back here.
  • sudo python3 ~/Bus-Departure-Board/ReadingBusesPy3.py -k [YOUR KEY HERE] -s [YOUR BUS STOP ID HERE]
  • sudo python3 ~/Bus-Departure-Board/NationalBusesPy3.py -a [YOUR ID HERE] -k [YOUR KEY HERE] -s [YOUR BUS STOP ID HERE] -b no
  • sudo python3 ~/Bus-Departure-Board/NationalRailPy3.py -k [YOUR KEY HERE] -s [YOUR STATION ID HERE]
  • sudo python3 ~/Bus-Departure-Board/LondonUndergroundPy3.py  -k [YOUR KEY HERE] -s [YOUR STATION ID HERE]
  • Ensure spacing and capitalisation is identical to the above, you do not need the square brackets around the values. If done correctly you should have something which looks similar to the bellow:
  • Why does the program need sudo permission? - The ONLY reason we need sudo permission is so we can restart your device automatically for you after doing a software update. The software source code is publicly viewable so you can check it out yourself to be sure.
Screenshot of the nano terminal.
  • Press 'Ctrl' + 'x', then 'y' and 'Enter' to save the file.
  •  chmod u+x startupDisplay.sh
  • sudo systemctl edit --force --full startupDisplay.service
  • Then once nano has loaded simply copy and paste the below text into the empty new file.
  • If your username is not "display" you will need to change some values here.

[Unit] Description=Starts up the bus or rail display once pi is powered on and connected Wants=network-online.target After=network-online.target [Service] Type=simple User=display WorkingDirectory=/home/display ExecStart=/bin/bash /home/display/startupDisplay.sh [Install] WantedBy=multi-user.target

  • Once again save and exit the file by pressing, 'Ctrl' + 'x', then 'y' and 'Enter'.
  • sudo systemctl enable startupDisplay.service
  • sudo systemctl start startupDisplay.service
If everything has been done correctly you should now see the display showing the bus stop or station that you wished to view. If the screen turns on but shows a 'No Services Found' message you have incorrectly entered your API details, go back and check them with 'sudo nano startupDisplay.sh'. If you just get a black screen run 'systemctl status startupDisplay.service' and see what error message is displayed. If you are still having issues try repeating the stage above or read more about it here.

You're up and running!

Awesome! If you've made it this far you should have a fully working bus or train display. Every time you plug in your new device the display will start running. You can stop here, or you can customise your display and go further!

© Copyright 2023 Jonathan Foot - All Rights Reserved

Cookie Policy  • Terms & Conditions Contact Me