Troubleshooting

Having some issues? Lets give this a try.

Unable to connect into your Raspberry Pi? Or "Unable to open connection ... Host does not exist"

If this happens it can be complicated to debug, first go to your router settings and find all currently connected devices. The method of doing this will differ depending on your router, but instructions should exist on the router itself or online.

If you do not see a device called "raspberrypi" listed anywhere then it has not connected to your WIFI correctly. I would first suggest moving closer to your router and using only the 2Ghz band if you are not already doing so.

If that fails, or you are connected to internet but cannot SSH in the please follow the instructions below. Take extra care to ensure they match the requirements. Capital letters and spacing is important!

If you are still having issues, there are additional links at the bottom of this page.

As a last resort, you might need to buy a mini-HDMI to HDMI cable and connect your Pi directly into a monitor. You can also buy a micro-USB to USB adapter to plug a keyboard directly into your Pi - this should not cost more than £10

  • Remove your Micro SD Card from the Raspberry Pi and Re-plug it into your desktop PC/Laptop.
  • You may find messages pop up asking for you to format the drive or scan it. Click "Cancel" or "Continue without scanning". These are appearing because the Micro SD card has been split into two partitions (parts) one is the boot partition and is readable from your Windows machine. The other half is formatted in a way unreadable on a Windows machine.
Example Windows Warning Messages.
  • Open up file explorer and navigate to the "boot" drive/ your Micro SD Card. You should see some files here. Make sure you turn on "File Name extensions" which can be found under "view" in file explorer.
  • Next right click "new" and then "text document". Call this document just "ssh" making sure to remove the ".txt" on the end of the name. This file should be completely empty. It's purpose is to simply enable SSH on your Pi for future steps.
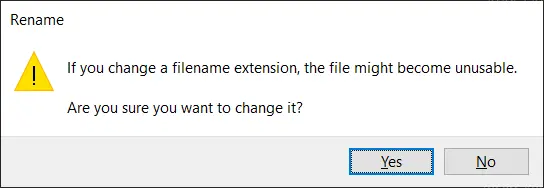
  • Next, once again right click and make a new text document called "wpa_supplicant.conf". Making sure that the end file extensions is ".conf" and NOT ".txt". You may be prompted asking are you sure you want to do this. Click "Yes". The purpose of this file is for your Pi to automatically connect to your WIFI upon startup; this is called "header-less booting".
Rename Warning Message.
  • Now open up your new file "wpa_supplicant.conf" into notepad. And copy and paste the below text. Being sure to replace the SSID and psk with your own WIFI network name and password; keep the "speech marks" around your new values. You may also need to change the country to your two-letter country code if you are not based in the UK.
  • The SSID is just simply the name of the WIFI network which you can see on your phone or computer when picking which to connect to. If you have both a 5G and 2G network I would recommend connecting your Pi to your 2G network for reliability reasons. Also ensure you have a strong WIFI signal for the network you are about to try connecting to.
  • More information on doing this can be found online here.

ctrl_interface=DIR=/var/run/wpa_supplicant GROUP=netdev
update_config=1
country=GB
network={
    ssid="YOUR NETWORK NAME HERE"
    psk="YOUR PASSWORD HERE"
    key_mgmt=WPA-PSK
}

  • Once you have made your blank "ssh" file and your "wpa_supplicant.conf" file right click on the drive in the file explorer and click "eject" to make it safe to remove the Micro SD card. Once ready, remove the card.
  • Now put the Micro SD card into your Pi and plug in the power to turn it, wait at least 3min and try to connect to it again.

© Copyright 2023 Jonathan Foot - All Rights Reserved

Cookie Policy  • Terms & Conditions Contact Me